
Subversion is the most popular free, cross platform Version Control Systems (VCS) available today. It also happens to be open source, is being actively developed and has a strong community behind it.
To quote from the Subversion Web site:
“The goal of the Subversion project is to build a version control system that is a compelling replacement for CVS in the open source community. The software is released under an Apache/BSD- style open source license.”
Version Control gives you a time machine for your files, enabling you to go back in time to any earlier version, see what changes have been made over time, and revert your work to an earlier version if need be. It also gives you an audit trail of changes and a commented history of those changes, amongst other capabilities.
The easiest way to use Subversion in Microsoft Windows is to use TortoiseSVNÂ To quote from the TortoiseSVN site:
“TortoiseSVN is a really easy to use Revision control / version control / source control software for Windows. Since it’s not an integration for a specific IDE you can use it with whatever development tools you like.”
TortoiseSVN  is a GUI client shell around Subversion and most anything that can be done on Subversion can be done in TortoiseSVN. TortoiseSVN (TSVN) includes Subversion (SVN), so you don’t necessarily need to download and install it. I’m very pleased to say that both SVN and TSVN are very well documented, which is atypical in the open source world. As much documentation as there is, I still found it difficult to both comprehend how SVN works and to start using it.
I’ve been using a Version Control System for many years, so I understand the basics, however Subversion takes a different approach to what I’m so used to, which is part of the reason I’ve been stumbling along. The main areas of difference is that SVN works at the directory level and I’m used to working at the file level. And I’m used to having files that are checked out being “locked” so other users can’t edit them, but SVN doesn’t use this model, although it is available.
The intent of this article is to both help me in my quest to better understand SVN/TSVN and to also help folks who find themselves in this same situation.
By the end of this article you will know how to setup and use TortoiseSVN with your existing projects, and hopefully get there without facing the same hurdles I did. You will also know how to use TortoiseSVN with our Programmer’s IDE ED for Windows.
Lets get started and work through setting up TortoiseSVN, placing files under version control and then working with those files. Note that my discussion will revolve around version control use by a single person, so you will need to do some further reading regards multi-person and team use. I’m also focusing on setting up TSVN/SVN to use an existing directory tree of files, not creating a new project from scratch.
Installing TortoiseSVN
Step one is to download and install TortoiseSVN which you will find here http://tortoisesvn.net/downloads
TortoiseSVN integrates into Windows Explorer and is used via. right click context menu’s in Explorer and other applications such as our ED4W. Once TSVN is installed you can right click anywhere in Windows Explorer and choose TortoiseSVN|Help to read the detailed product help.
Creating a Repository
Step two is to Create a Repository to hold your versioned files. An SVN Repository is created in a folder on your local drive or on a networked drive. The repository contains a virtual file system where all of the files you place under version control are held and maintained, along with other metadata such as comments you add about file changes. A repository can be moved to a different location and of course backed up.
There are three ways to access an SVN repository. The simplest and the one I’ll be using in this article is to treat it as a local file system. The other two enable repositories to be stored on remote servers and accessed over the Internet. All three methods use a URL to access the repository, either file://, svn:// or http:// plus secure versions of these such as https://.
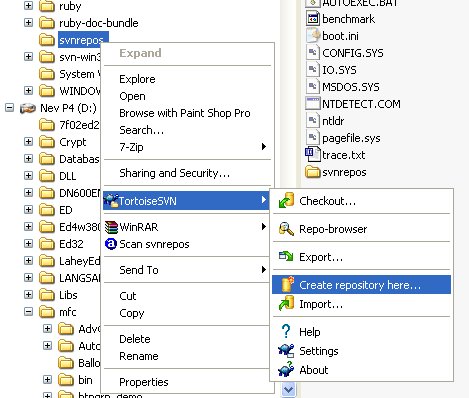
You need to decide where you want the repository created (which drive and base folder), then create a new folder to hold it. Right click on this new folder in Windows Explorer and choose TortoiseSVN|Create repository here… For this article the repository is in c:\svnrepos.
Â
Leave the default ‘Native filesystem (FSFS)’ selected and click OK.

To learn about suggested Repository Layouts see Chapter 5.2.1 in the TSVN Help.
To create the example repository layout I’m using for this article follow these steps:
- Right click on c:\svnrepos and select TortoiseSVN|Repo-browser.
- Right click on “file:///C:/svnrepos” in the Browser window and select ‘Create Folder…’
- Enter a name based on the project you want to use. eg. “Ruler”
- Create three folders in this project folder: “trunk”, “branches” and “tags”
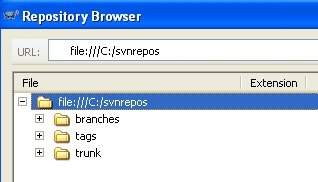
You should now have:
Â
The “Working Copy”
In addition to the SVN Repository each SVN user has their own “Working Copy” of the repository. This is where you edit files and create new files etc. Note that you never access files in the repository directly, only via. the working copy. In fact if your peak inside the repository with Windows Explorer you can’t even see your files.
Adding an existing set of files to the repository
Our next step is to our add existing files to the SVN repository we just created, so that they can be put under version control. There are two ways to do this.
The commonly suggested method is to use Import – see TSVN Chapter 5.2.2. TortoiseSVN|Import…Â will import an entire directory tree, including all files, into the repository. I don’t like this approach because you have to Checkout the files to create your ‘Working Copy’, which is fine, except that you can only checkout into an empty directory. This means that if you aren’t putting all files and folders within a directory tree, under version control, you will have to merge the missing files and folders from their original home into the newly created working copy, which is messy and error prone.
The second method is to use TortoiseSVN|Repo-browser and Checkout the trunk folder (or a sub-folder) to the base of the directory tree containing our existing files and then Commit that directory to TSVN.
For this example I’ve created a Folder named “RulerSrc” within the “trunk” folder and my existing tree of source files is located in D:\MFC\Ruler. Right click on “RulerSrc” in Repo-browser and select Checkout.

The ‘URL of repository’ will already be set correctly and for ‘Checkout directory’ enter “D:\mfc\Ruler” and press OK. Then press “Yes” at the “D:\mfc\Ruler” isn’t empty prompt. Windows Explorer will now show “D:\mfc\Ruler” with a checkout overlay image.
Â
Now we need to add the files and folders for “D:\mfc\Ruler” to the repository. This is where I faced my biggest hurdle, as I didn’t want to include all of the files and folders in my existing directory tree in the repository. I’m referring to temporary files, such as compiler output files and entire directories such as \Debug and \Release. It took lots of reading and a few posts to the TSVN mailing list before I knew how to handle this.
Excluding files and folders from the repository
It was clear from my reading that you use ‘Add to ignore list’ to inform SVN about which files and folders you don’t want added to the repository. However before ‘Add to ignore list’ can be used on a file or a folder, the parent folder must be added to SVN. As I commented on the mailing list: “This just seems backwards. ie. I have to ‘Add’ things before I can ‘Remove’ sub-things.” It would be far simpler if I could simply submit a list of files and folder paths to ignore, to a folder in the SVN repository.
The SVN Book and TSVN Help both state that you use the Ignore option before using Import or Add, but neither tell you that you can only use Ignore (svn:ignore) on folders that SVN is already aware of. It is basically a chicken and egg situation. See the FAQ item How Can I select files and folders to import.Â
TSVN/SVN does enable you to specify a Global list of files and folders to exclude, however this list affects every SVN repository that you create, every project in every repository and every user using the repository. This is fine for files that makes sense to be ignored on a global basis, such as transient and temporary compiler output files, but is too course grained for other exclusion requirements. That said you should definitely setup the TortoiseSVN|Settings|General|Global ignore pattern. Do this now before proceeding. See TSVN Chapter 5.26.1. for details.

Â
Adding and excluding files and folders
So back to ignoring files on a per project and per user basis. As I stated above we need start by Adding all of the folders and files we want included in the repository. To do this use TortoiseSVN|Add.
An important point to be aware of is that “Add” doesn’t actually add anything to the repository. In fact you don’t even need access to the repository to use Add, which is an important capability for folks that create new files, but aren’t always connected to the repository. Add simply adds the chosen file or folder name to a list, which is stored in the .svn directories of your local ‘working copy’. When you next Commit your changes, this list is used to help build the list of files to be committed.
Note that TSVN works with three categories of files; Versioned files (those in the repository), Unversioned files (files which aren’t in the repository) and Ignored files (unversioned files which are ignored during Add, Commit etc).
Apart from adding the files and folders “you do want” in the repository, you must also add all of the folders that contain files that “you don’t want” in the repository. Only then can you use ‘Add to ignore list’ for every folder and file that you want excluded from the commit process, and hence the repository.
Don’t add folders for directory trees that you don’t want in the repository. Add their parent folder and then use ‘Add to ignore list’ on the folder to exclude it and its sub-directories.
You don’t actually have to add files here as you can select them when you do the commit. Use whatever works best for you. Folders are the important thing, so we can use ‘Add to ignore list’ on files in any required folder.
If you add a file by mistake use TortoiseSVN|Revert… to remove it from the ‘add list’. And if you ignore a file and then change your mind, use TortoiseSVN|Remove from ignore list.
Note that ‘Add to ignore list’ is not available for files or folders that match the Global ignore list patterns, nor for files added to the queue.
Once you’ve completed the Add and Ignore processes you can finally get the files into the repository.
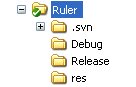
This picture shows the overlay images in Windows Explorer after we’ve added files and before they are committed.
Getting committed
Whenever you want to update the SVN repository so that it includes the changes you’ve made in your ‘working copy’ you need to commit your changes. To do this right click on “D:\MFC\Ruler” in Explorer and select ‘SVN Commit…’ from the context menu.
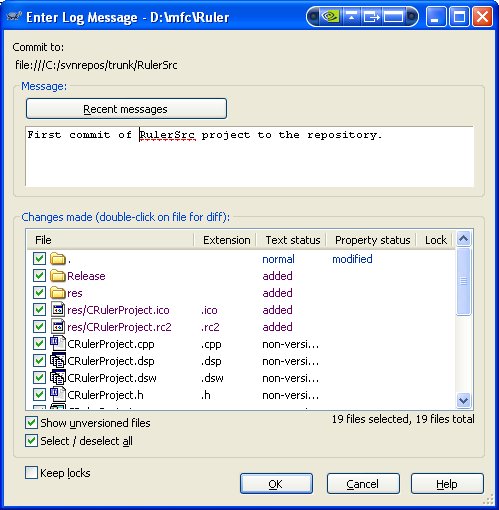
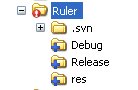
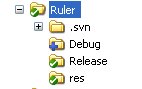
In the Commit Dialog write a message stating the reason for this commit. Enable ‘Show unversioned files’ if necessary and verify that all of the files you want to place under version control are checked, then click OK. Commit then adds all of our existing files and folders to the repository and Explorer changes as shown here. The Debug folder is in the ignore list, which explains its overlay image.
Â
To verify the contents of the repository use TortoiseSVN|Repo-browser.
Following this second method enables you to use your existing files and folders as is, without the issues raised if you were to use Import. I borrowed this from technique from here.
Â
Working with the Repository
Ok so now we have an existing project under version control, what next.
- Note: In the scenario I’m writing about here, we have a “Working Copy” in place, but if you don’t, you need to Checkout the relevant directory tree from the repository into an empty directory to create your working copy. Use TortoiseSVN|Repo-browser for this.
You can now edit your files as you normally would. If you create a new file you can use TortoiseSVN|Add to add it to the pending queue, or alternatively select the file from the non-versioned list of files at the next commit.
You can see the changes you’ve made during editing by viewing what’s different between it and a versioned copy of the file in the repository. TortoiseSVN|Diff does this. Diff is also on the right click context menu inside TortoiseSVN|Commit… and TortoiseSVN|Check for modifications…
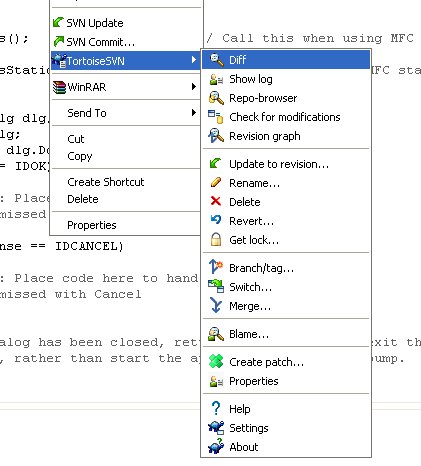
This picture shows the TortoiseSVN context menu activated on the current file in ED for Windows, ready to do a Diff.
You can use EDs Difference Analysis to view and merge differences by adding it to TSVN. Use TortoiseSVN|Settings|External Programs|Diff Viewer and set the External option along with:
“C:\Program Files\SAIG\ED4W\ED32.exe” -1- -np -nf -diff %base %mine
as shown here.

See TSVN Help section: 5.9. “Viewing Differences” for more information.
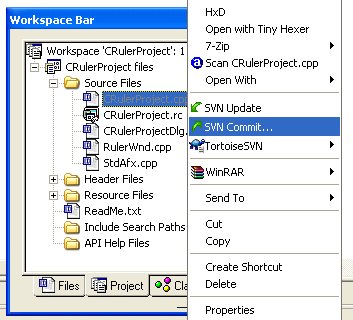
When you are satisfied with your editing and want to update the repository so that it includes your changes, it is time to commit the file. If you’ve edited a number of files or added some new files, then it is best to commit the base folder. ie. Right click on the folder in Explorer or EDs Files Tree and choose: SVN Commit… If you just want to commit the changes for a single file, then you can do that as well by selecting the file in Explorer or ED and using SVN Commit…
If you are working with other users then you need to use SVN Update to resolve any conflicts that come about from someone else editing the same files as you have. See TSVN Chapter 5.5. “Update Your Working Copy With Changes From Others” for details.
Â
Using ED for Windows with TortoiseSVN
The Windows Explorer TortoiseSVN menu commands can be used directly inside ED for Windows. This enables you to commit a file or a folder, update it, view differences etc.
TortoiseSVN is available from EDs Explorer context menu. To open ED’s Explorer menu right click on whitespace in an editing window, use File|Explorer or right click on a file in the Project window. To access the Explorer menu for a Folder, right click on the Folder in ED’s Files Tree (File|Files Workspace).
Â
You can also execute any TortoiseSVN command directly from ED using TortoiseProc.exe as documented in the TSVN Help: Appendix D. Automating TortoiseSVN
To open the TSVN Repository Browser from ED, for a specific repository, you can use:
File|Run Program… “C:\Program Files\TortoiseSVN\bin\TortoiseProc” /command:repobrowser /path:”uri/to/repository” /notempfile
This could be setup as an ED Macro or on a Toolbar button. You could also get ED to prompt for the repository URL.
To commit the current file you would use:
“C:\Program Files\TortoiseSVN\bin\TortoiseProc” /command:commit /path:”<name>” /notempfile /closeonend
Again this can be assigned to a toolbar button, menu etc.
Â
Finale
The focus of this article is to help you get an existing code base set up under version control as quickly and easily as possible. However there is a lot more to TortoiseSVN and Subversion than what I’ve covered here. I would urge you to read the Subversion Book and the TortoiseSVN Help thoroughly before committing yourself and your team to using it.
The picture http://blog.surfulater.com/images/tsvn-repofolders.jpg is inconsistent with the description above. It looks like those folders are created right in the root folder and there’s no sign of the ‘Ruler’ folder. It got me confused.
Dan, you are right. Apologies for the confusion.
I recreated the repository a number of times and somehow forget the “Ruler” folder in the final example. You will just have pretend its there. 😉
Thanks for the nice tutorial. I am new to subversion, just installed and commit a a project, now all folders have a new folder .svn, when i release the software, i have to delete all the .svn folders myself ? Or is there any command to checkout source code without .svn folder ?
Hi Yujin,
Good to hear the tutorial was useful.
You can use TortoiseSVN -> Export to get a copy of the repository without the .svn directories. See: “5.23. Exporting a Subversion Working Copy” in the Help for details.
Maybe we can convert the world! 🙂
Hans has written a very good article “Version Control for the Standalone Programmer – Part 1” which you can find at: http://www.codeproject.com/gen/work/XTortoiseSVN.asp
I would have love to have found this when I was starting out with TSVN.
Thanks very very much for your publication; I an absolut beginner in the topic of version management and your report helped me, to start in a quite short time.
Thanks for the good tutorial and it is very useful for a newbie like me. Really nice of you to sit and patiently jot down things to help others.
Just have a question. Can I change the revision numbers after commit to 1.0, 1.1, 1.2 etc….